Quick answer: Cannabis training is the practice of physically shaping a plant - bending and tying it, or cutting it - so it grows wide and flat instead of tall and single-stemmed. It breaks apical dominance, the plant's built-in instinct to pour energy into one top, and spreads that energy across many evenly lit bud sites. The low-stress methods (LST, ScrOG) bend without cutting; the high-stress methods (topping, FIMing, mainlining, manifolding, super cropping) cut or crush. Most growers should combine two of them.
Our default is two toppings plus continuous low-stress training for photoperiod plants, started from the very first grow. We run the same routine on autoflowers too, with one early topping instead of two. This guide gives you that exact step-by-step routine first, then explains every individual method so you can see where each one fits and swap in whichever suits your setup. Training is the single highest-leverage thing you can do to a plant, and it costs nothing but attention.
NOTE: Throughout this guide, "photoperiod" means a plant that flowers when you cut its light to 12 hours, and "autoflower" means a plant that flowers on an internal clock regardless of light. The methods are the same for both. The timing is not, and that distinction is called out in every section where it matters.

Cannabis training is what separates a plant that yields one fat top and a skirt of useless popcorn from a plant that fills its entire footprint with evenly sized buds. The stakes are real: what home growers actually harvest in a year spans from a few ounces to multiple pounds, and in our 2026 survey 63% pulled at least a pound (450 g). Left alone, a cannabis plant grows like a Christmas tree: one dominant central cola, everything below it shaded and stunted. Training overrides that. By bending, tying, or cutting the plant while it is young and flexible, you redistribute its growth so light reaches dozens of bud sites instead of one.
This guide is built in the order you will actually use it. First the first-principles reason every method works, then a plain-language decoder for the jargon, then the complete routine we run start to finish, and finally each individual technique with a clear "when to use it" so you can adapt the routine to your own grow. Training runs from early veg until the first few weeks of the flowering stage, then stops. If you are new to this and still learning how to grow weed, training is the step that makes the biggest difference once your plant is established.
What Cannabis Training Is and Why It Works
Every cannabis training method, no matter how different they look, pulls the same lever: apical dominance. A cannabis plant concentrates a growth hormone called auxin in its highest growing tip. That auxin tells the lower branches to stay small and submissive so the plant can race upward toward the sun.1 In the wild that is a smart survival strategy. In a grow tent or a backyard, it is the enemy, because it gives you one big cola and a dozen runts.
Training breaks that hierarchy. When you bend the main stem sideways, the auxin that was pooling at the top redistributes along the whole plant, and the lower growth sites are suddenly allowed to surge.2 When you cut the top off, you remove the auxin source entirely, and the two nodes below it both promote to lead branches. Either way, the plant stops behaving like one stem and starts behaving like many. The science of how that hormonal signal controls branching has been studied for over a century,3 and the mechanism itself is well established.4

The second principle is light. Light intensity falls off fast with distance and shading, so a bud sitting 30 cm (12 in) below the canopy receives a fraction of the light a top cola gets, and it develops accordingly. Cannabis also actively grows toward light through an auxin-driven response called phototropism, which is why a branch fills in quickly once you bend it out of the shade and into the open.5 Training solves the shading problem by flattening the plant into a level canopy where every bud site sits at roughly the same height, in roughly the same light. The buds that lose out are the shaded lower ones: when researchers added light beneath the canopy, those lower buds gained yield and quality, which shows how light-limited they normally are.6 That is the whole game: break apical dominance to create more bud sites, then arrange those sites so light hits them evenly. More sites, evenly lit, is how trained plants outperform untrained ones - not magic, just better light distribution.
This is why we do not make raw yield claims with a number attached. The honest, evidence-backed statement is mechanistic: training increases the number of viable bud sites and improves how evenly light reaches them. Exactly how much that helps depends on your genetics, your light and your environment - the factors a cannabis yield meta-analysis actually identifies7 - but the direction is consistent and the mechanism is real.
The Words You Need Before You Start
Training guides are written by people who forgot they ever had to learn this vocabulary. Here is the whole glossary you need for this article, in plain language. If you already know these, skip straight to the routine.

| Term | What it actually means |
|---|---|
| Node | The point on the stem where a pair of branches or leaves comes out. Nodes are how you count a plant's age and where you decide to cut. "The 5th node" means the 5th such junction counting up from the bottom. |
| Growth site | A shoot that can become a branch and eventually a bud. Each node has two, one on each side, so 4 nodes gives you 8 growth sites. |
| Cola | A main flowering top - the dense cluster of buds at the end of a branch. More colas at even height is the whole objective of training. |
| Popcorn | The small, loose, airy buds that form low on the plant where light never reaches. Named for what they look like. Training exists largely to prevent them. |
| Veg | The vegetative stage - the leafy growing phase before flowering. All cutting happens here, because the plant has time to recover. |
| The flip | The moment you switch an indoor photoperiod plant to 12 hours of light per day, which triggers flowering. Outdoors and with autoflowers it happens on its own. |
| The stretch | The rapid upward growth spurt in roughly the first 2 to 3 weeks of flowering, when a plant grows by half to double in height. Training ends when the stretch ends. |
| Lignified | Gone woody. A young green stem bends; a lignified one snaps. This is why training is a veg-stage job. |

Get the free Training Cheat Sheet
When to make the first cut, how one stem becomes eight sites, and the clip-and-wire spread that flattens the canopy. One page for the routine, one for the schedule from node 5 to the flip. Printable, phone-friendly.
Get the Training Cheat SheetThe Complete Training Routine, Step by Step
The routine is topping plus continuous LST, run on a schedule, from the first grow. For photoperiod plants that means two toppings and ongoing low-stress training. For autoflowers it means one early topping and ongoing LST. It runs in three stages: build the structure, multiply and spread it, then support it through flower. It is not a mainline and not a manifold - those rebuild the plant around a single symmetric hub, which costs more veg weeks than most home growers have. This keeps four productive nodes and trains all eight sites outward instead. Here is exactly how we do it. This is the topping-first routine: the cut always comes before the first bend. The bend-first alternative, where you lay the main stalk over at the 5th node and top later if at all, is the LST guide. Both are valid; they are different methods.

▶ Watch the full seed-to-harvest grow on YouTube
Before You Start: The Four Preconditions
Every failure we see with this routine traces back to skipping one of these. None of them are optional:
- The 6th node has appeared. Roughly 3 to 5 weeks from germination. The 6th node showing is the signal, because it is the growth you are about to cut off - which leaves 5 nodes below the cut. Any fewer and there is not enough structure to build a canopy from.
- It is already in its final pot. Top after transplanting, not before. Asking a plant to recover from a root disturbance and a cut at the same time doubles the setback.
- It is healthy. Deep green, growing visibly week to week, no yellowing or spotting. Never train a plant that is fighting something else - fix the deficiency first, then train.
- You have clean, sharp, thin-tipped scissors. A crushed cut heals slower than a clean one and is where rot starts. Dip the blades in a 10 percent bleach solution for 2 minutes between plants and rinse them; an alcohol wipe does not kill hop latent viroid.

Here is the whole routine on one schedule, so you can see where you are at any point:
| Stage | When | What you do | What it should look like after |
|---|---|---|---|
| Setup | When the 6th node appears, 3 to 5 weeks in | Top between the 5th and 6th node, remove the 1st node | A flat-topped plant with 4 nodes and 8 short shoots, no central leader |
| Stage 1 | 1 to 2 weeks after topping | Bend all 8 sites outward - clips on top, wire on bottom | A flat circle of 8 shoots at even height, center of the plant open to the light |
| Stage 2 | Every 1 to 2 weeks, rest of veg; the second topping 2 to 3 weeks after the first cut | Light defoliation, second topping on the top 4 only, retrain wider | A widening flat canopy, 16 to 32 future colas across the 8 branches, no branch obviously taller |
| Stage 3 | From day 21 of flower, when the stretch ends | Stop shaping, start supporting - wire ties or a trellis net | A level canopy of colas holding their own weight without leaning |
Setup: Top Above the 5th Node, Remove the 1st Node
Once the 6th node has appeared and you have transplanted into the final pot, top the main stem above the 5th node - the cut takes off the 6th node and everything above it. Then remove the 1st (lowest) node entirely.
The 5th node is not an arbitrary number. Cut lower and you leave too few nodes to build a canopy from. Cut higher and you have burned veg weeks growing a stem you are about to throw away, and the lower nodes have already been shaded into weakness while they waited. At the 5th node the stem is thick enough to survive the cut without stalling, and flexible enough that everything below it will still bend.
The 1st node comes off for a different reason: it sits in permanent shade at the bottom of the plant, below every branch you are about to spread over it. It will never receive enough light to make anything but popcorn, and it will spend the whole grow drawing energy to do it. Removing it is not a loss, it is a redirect.
That reasoning depends on the node being shaded, so it does not survive every setup. If you bend the main stalk flat across the pot rather than topping an upright plant, nothing ends up above the 1st node and its fan leaves keep earning their place - you take the growth sites and leave the leaves. The LST guide has that version. Judge it by what is above the node, not by which node it is.

Counting nodes trips up more first-time growers than the cut itself. Count only true nodes, starting from the bottom of the stem: a node is a point where a pair of branches or leaves emerges. The very first two rounded leaves the seedling opened with are cotyledons, or seed leaves, and they do not count - they are the plant's packed lunch, not part of its structure. Start counting at the first pair of real, serrated cannabis leaves. That is node 1.
The cut itself goes just above the 5th node, leaving a short stub of about 5 mm (0.2 in) rather than slicing flush against it. A flush cut nicks the two shoots you are trying to promote; too long a stub dies back and gives rot somewhere to start. One clean pass with sharp scissors, no sawing.

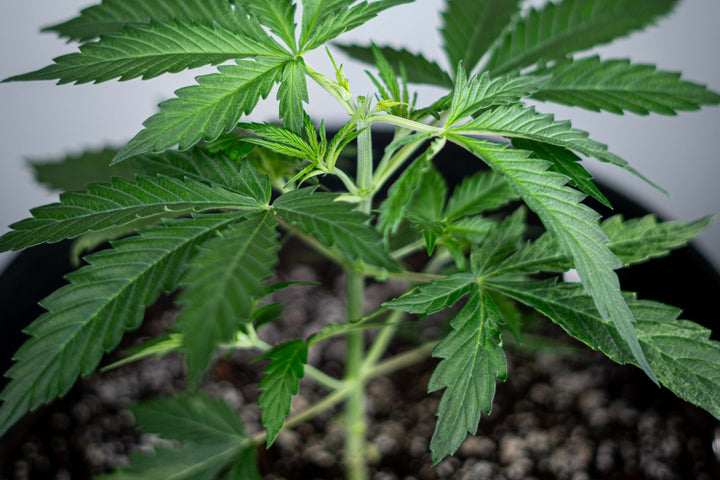
That arithmetic leaves you 4 productive nodes and 8 growth sites, which is the skeleton the whole routine is built on. What good looks like: a plant with a flat top where the main stem used to be, four evenly spaced pairs of shoots below it, and nothing trying to be the new leader.
Stage 1: First LST
Start Stage 1 about 1 to 2 weeks after topping, once the top growth sites are around 5 cm (2 in) long. Waiting matters - shoots shorter than that have nothing to grip and tear easily. The goal is to bend all 8 growth sites outward into a flat, even circle so light reaches every one of them. Work from the top of the plant down:
- Top 2 nodes - use clips. Clamp an LST clip like the BudClips onto the main stalk just below the top node and bend the branch outward into the second pin. The clips interlock, so you can clip the opposite branch from the same node and get a symmetric split. If a branch feels like it might snap, do a "branch squeeze" first: pinch the fibers flat at the sharpest point of the curve so it bends instead of breaking.

- Bottom 2 nodes - use wire. Cut a 10 to 15 cm (4 to 6 in) piece of garden wire like the BudHuggers, hook one end to the nearest grommet - the metal-ringed eyelet stitched into the pot, pull the branch down and out, and loop the wire around it at least twice the branch's diameter so it will not strangle as it thickens.

- Arrange symmetrically. Position all 8 branches at a similar height with even spacing, opposite branches 180 degrees apart. Keep the bottom branches level with the top ones so nothing gets shaded into a runt.

If you tear a branch during any of this, do not panic. Cannabis heals fast. Wrap a partial break with plant tape, bring both sides of the tissue together, and it will knit back within 1 to 2 weeks - the same repair you would use for any broken branch.
What good looks like: from directly above, the plant reads as a flat ring of 8 shoots with an open center. If you can see the soil through the middle of the plant, you have done it right. If it still looks like a bush with a dome, the branches are not out far enough.

Stage 2: Defoliate, Top Again, Retrain
Stage 2 repeats every 1 to 2 weeks through the rest of veg. Each pass has three steps:
- Light defoliation. Remove the oldest main-stalk leaves and any leaf or branch sitting in the shade. They are draining energy they no longer pay back. Skip this step if the plant is showing a nutrient deficiency.
- Cut them, do not pull them, and do it after a feed. A pulled leaf can tear a strip of skin down the stem, and that open wound is a route in for pathogens. A properly hydrated plant snaps clean; one that is even slightly thirsty goes stringy and tears. Our defoliation guide has the full technique.

- Top again (photoperiods). Top only the 4 top branches a second time, 2 to 3 weeks after the first cut and once the new growth has hardened into clear branches, topping each one above its 4th or 5th node. The growth sites left below each cut develop too, so each branch ends up carrying 2 to 4 future colas. Leave the 4 bottom branches alone so they can catch up. Prune any dwarfed growth site - where a node has one strong and one weak shoot, cut the weak one. Autoflowers skip this second topping.

- Retrain wider. Move the clips and wires further out along each branch to keep opening the canopy. Pull old clips off the spots where the stem has thickened so they do not choke it.

How many times you repeat Stage 2 depends on how long you veg. Indoors, most growers get two or three passes before the flip. Outdoors you may run it for months. The second topping only happens once, 2 to 3 weeks after the first cut, which is usually the first pass; every pass after that is defoliate and retrain only.
What good looks like: a canopy that is getting wider rather than taller, with 16 to 32 future colas across the 8 branches - the four you topped and the four you left alone - all sitting within a few centimeters (an inch or two) of the same height. If one branch is clearly winning, it did not get bent far enough - pull it back down before the next pass.
Stage 3: Support Through Flower
Active training stops when the stretch ends, around day 21 of flower. The reason is not that the stems have gone woody. It is that by then the bud sites are set: reshaping the plant cannot add a single one, so all it can do is put the buds you already have at risk. There is one exception, and it is the net - if you are running a trellis, keep tucking branches through the stretch, because tucking is the one kind of training that still earns its keep in early flower. Everything else switches from shaping to supporting: tie opposite branches together with garden wire like the BudHuggers, or run a trellis net, so the canopy can hold heavy buds without leaning. Everything from here is weight support, not training. The full flowering playbook is in the flowering stage guide.
Supporting is simpler than training and easier to leave too late. The most reliable method is to pair branches across the plant: run a length of wire between two colas sitting opposite each other and let them hold each other up, so the load stays inside the plant instead of pulling it apart. A trellis net does the same job for a whole canopy at once, but it has to go in before the stretch finishes - threading a net through a plant already carrying buds means bruising the buds you are trying to protect.
The check is simple: if a cola leans more than about 45 degrees off vertical, or you can see the branch flexing when you fan the plant with your hand, it needs support now rather than next week. Buds gain most of their weight in the back half of flower, so a branch that is merely bending in week 4 is the one that folds in week 7.

What the whole routine is for: one plant, one pot, a dozen colas sitting at the same height in the same light. This is what a flat canopy looks like when it finishes.

Running the Routine on Autoflowers
The common advice is to never top an autoflower. We disagree, and we have run the full routine on autos many times with strong results. The catch is timing. An autoflower flips to flower on its own clock, so it cannot afford a late setback. Top it in the same place you would a photoperiod, above the 5th node once the 6th appears - the node does not change, the margin for error does. An auto will not wait for you, so be ready when it gets there rather than catching it late. Because autos move fast, they usually get one early topping rather than two, plus continuous LST the whole way. By the time a photoperiod plant would get its second topping in veg week 5 to 8, most autos have already begun to flower, which is why the second topping is a photoperiod move. If you are not confident on your auto's timing, run LST only - it is the no-risk option and still builds an even canopy.

The Five Mistakes That Break This Routine
- Topping before the 6th node appears. The most common one. An impatient cut on a 3-node plant leaves you two weak branches instead of eight strong sites, and the plant stalls for a week paying for it.
- Training a sick plant. Training costs a plant energy it has to have spare. On a deficient plant, or one that has gone root-bound with its roots circling a pot it has outgrown, it compounds the problem instead of improving the structure.
- Leaving clips on a thickening stem. A clip that fit perfectly two weeks ago will choke the stem it is gripping. Every Stage 2 pass, move every clip.
- Topping all 8 branches on the second pass. Top the 4 upper branches only. Cutting all eight sets the whole plant back at once and leaves the lower branches permanently behind.
- Training past the stretch. Once the stretch ends, around day 21 of flower, the bud sites are already set. Reshaping then cannot add a single site - it can only cost you the ones you have.

The Individual Training Methods, and When to Use Each
The routine above combines two methods, topping and LST, because that pairing is the most forgiving way to get an even canopy. But every method below is a legitimate tool, and some of them suit particular setups better than our default does. Each one has a full guide behind it. If you are not sure which you need, the table directly below sorts them by situation.
How to Choose: LST vs HST and Beyond
The first decision is low-stress versus high-stress. Low-stress training (bending) never wounds the plant, so it carries no recovery cost and suits any grow, any experience level, any plant type. High-stress training (cutting or crushing - topping, FIMing, mainlining, super cropping) multiplies bud sites faster and builds more dramatic structure, but it costs the plant recovery time and demands better timing. The reason this is not an either-or is that the best results come from combining a high-stress method (topping) with a low-stress one (LST). HST builds the colas, LST arranges them.
From there, pick by your goal and your situation:
| Your situation | Best method | Why |
|---|---|---|
| First grow, or you want the safest option | Topping plus LST (the routine above) | No recovery cost, hard to ruin, and it teaches you how the plant responds. |
| You want a perfectly symmetric showpiece | Mainlining or manifolding | Equal colas and a manifold hub, if you have the veg weeks to build it. |
| Indoor, filling a fixed tent footprint | ScrOG over LST | The screen fills the exact footprint with an even canopy. |
| A branch is too tall or has gone woody | Super cropping | Bends a stiff branch back into the canopy when tying no longer works. |
| Growing an autoflower | The routine above, topped early and once | It works on autos, but the timing window is much tighter. |
If you are still unsure, default to topping plus LST. It is the combination we have run on the widest range of plants, and it is forgiving enough for a first grow while still producing the even canopy that advanced methods chase.
Low-Stress Training (LST)
Low-stress training is the foundation and the backbone of the routine above. You bend the branches down and outward and tie them in place, so the plant grows flat and wide without ever being cut. Because nothing is wounded, there is no recovery period - the plant keeps growing at full speed while you reshape it.
When to use it: always. LST is the one method that works on every plant, every time, with effectively zero downside, and it is the only training we recommend running continuously from start to finish. It is also the right and only answer if you are nervous about cutting.
For the full three-stage walkthrough, including how to bend the main stem to 90 degrees without snapping it and how to build a flat canopy node by node, read the complete LST guide. For the tool-by-tool technique, see how to use LST clips step by step.

Topping
Topping is the most common high-stress method, and the other half of our routine. You cut the growing tip off the main stem, just above a node. Removing that tip deletes the plant's main auxin source, and the two shoots at the node below it both promote into main branches. One cola becomes two. Do it again to each of those, and two become four. Pruning cannabis specifically has been studied. In a controlled indoor trial, topped plants produced significantly more inflorescence dry weight than unpruned controls, and grew a visibly different structure - although total cannabinoid yield did not separate from the control at a significant level.8 The same trial found cannabinoid concentration highest in the top of the plant and lowest at the bottom, which is the measured version of the argument this whole page is making: more of your plant up in the light is worth more than more of your plant.

When to use it: in veg, once the 6th node has appeared, and never in flower. Topping sets the plant back a few days while it heals, which is exactly why it belongs where there is time to spare.
For the clean-cut technique, sterile-scissor practice, and how to recover, read the full topping guide.
FIMing
FIMing is topping's messier cousin. Instead of a clean cut above a node, you pinch or snip off roughly the top 75% of the newest growth tip, leaving a ragged stump. The name comes from the grower shorthand "F, I Missed," because it started as a botched topping. Instead of two clean colas, you can get three, four, or even five uneven growth sites from a single cut.
We do not recommend it. The extra growth sites arrive at uneven heights, which costs you the flat canopy that everything downstream depends on, and the technique began as a botched topping cut rather than a designed one. Top instead. Never FIM an autoflower - it has no spare time to recover from a ragged cut.

The mechanics of both cuts are compared side by side in the topping guide.
Mainlining and Manifolding
Mainlining and manifolding are topping taken to its logical, symmetric extreme. Instead of topping wherever the plant happens to be, you cut down to a single clean hub low on the plant and then force every branch above it to grow as an equal, mirror-image cola. The payoff is a perfectly even plant where each cola gets identical light and grows to identical size.
The two are close relatives. Mainlining builds the hub gradually by doubling colas one topping at a time, following the 1-2-4-8 pattern. Manifolding gets to a similar structure in two topping events instead of three or four: one early, aggressive cut down to a chosen node to make four branches, then a second round to multiply those.
When to use them: when you want a showpiece even canopy and have the extra veg weeks to build it. Both demand more nerve than our default routine, because you commit the plant's whole structure up front, and mainlining in particular costs the most veg weeks - three or four cuts with a recovery period after each. This is the main reason we do not run them as our standard: they are better structures, bought with weeks most home growers would rather spend flowering.

Full step-by-steps live in the mainlining guide and the manifolding guide.
Super Cropping (High-Stress Training)
Super cropping is the most hands-on high-stress method. You pinch a branch firmly, roll it between your fingers to crush the stiff inner core, then bend it over - damaging the inside of the stem while keeping the green outer skin intact. The plant repairs the crushed spot with a swollen "knuckle" that is thicker and stronger than the original stem, and the branch now bends where you want it.
When to use it: as a corrective, not a plan. It is the move for a branch that has grown too tall for the canopy or has lignified past the point where you can simply tie it down, not a move for a plant in flower. Use it in late veg only: structural training ends at the flip, and a flowering plant outgrowing its light is a case for raising the light or tucking under a net, not for a new bend.

The risk is obvious: if you bend before the inner core is soft, the skin tears. A clean tear is not a disaster - wrap it with repair tape like BudSavers and it heals in 1 to 2 weeks, the same fix you would use for any broken branch.
Defoliation
Defoliation is not training in the strict sense - you are not reshaping the plant, you are removing leaves - but it is the support technique that makes every training method work better, and it is Step 1 of every Stage 2 pass above. You strategically pull old, large, and shaded fan leaves to open airflow and let light reach the bud sites underneath.
When to use it: a light pass in veg, and again right after the stretch ends. The danger is overdoing it - leaves are the plant's solar panels, and stripping too many starves it. Remove what is old, damaged, or shading a bud site; leave what is healthy and catching light.

The full timing and technique, including the two windows where you must not defoliate at all, is in the defoliation guide.
ScrOG (Screen of Green)
ScrOG, short for Screen of Green, is LST with a net doing the work. You stretch a horizontal trellis net above the plant and tuck branches under and through it as they grow, so the screen forces an even, flat canopy and holds it there.
When to use it: indoors, when you are trying to fill a fixed tent footprint as completely as possible. ScrOG is a canopy-management layer you run on top of LST and topping, not a replacement for them - the net does not break apical dominance by itself. For most home growers, the routine above gets you most of what a screen would, with less equipment.

The full screen build, net height, and tucking schedule is in the complete Screen of Green (SCROG) guide, and the light physics behind why a level canopy wins is in the canopy development science article.
When to Start and Stop Training
The biggest timing mistakes are starting too late and stopping too late. Here is the whole timeline at a glance, and the windows for each method:

The universal rules, regardless of method:
- Do not train a seedling. Weeks 0 to 2 are for establishing roots. Let it build a flexible stem and about 5 nodes first.
- Start when the 6th node appears, roughly 3 to 5 weeks in. You cut above the 5th, so the 6th showing is your signal. This is when the stem is flexible enough to bend and the plant can absorb a topping.
- Do all your cutting in veg. Topping, FIMing, mainlining cuts - all of it belongs in the vegetative stage where the plant has time to recover. The last call for any topping is well before the flip.
- Stop active training when the stretch ends, around day 21 of flower. The bud sites are set by then, so reshaping cannot add any and can only cost you. Tucking under a trellis net is the exception and runs right through the stretch. LST clips are a veg tool - we do not recommend them in flower at all. From the flip onward it is wire ties and nets, and they are there to support weight, not to reshape.
Get those four right and the routine almost runs itself. The plant tells you when it is ready - the 6th node showing and a bendable stem to start, and a canopy of set bud sites to stop.
Frequently Asked Questions
What is cannabis plant training?
Cannabis plant training is physically shaping a plant - bending and tying it, or cutting it - so it grows wide and flat instead of tall with one dominant top. It works by breaking apical dominance, which spreads the plant's energy across many bud sites and lets light reach all of them evenly. The result is more usable bud sites rather than one big cola over a skirt of popcorn.
What are the main cannabis training methods?
The main methods are low-stress training (LST), topping, FIMing, mainlining, manifolding, super cropping, and ScrOG. They split into low-stress methods that bend without cutting (LST, ScrOG) and high-stress methods that cut or crush (topping, FIMing, mainlining, manifolding, super cropping). Defoliation, removing leaves, is a support technique layered on top. Most growers combine one high-stress method with LST.
Low-stress vs high-stress training - which should I use?
Use both. Low-stress training bends the plant without wounding it, so there is no recovery time and it suits any grow. High-stress training cuts or crushes to multiply bud sites faster but costs recovery time and needs better timing. The strongest results come from combining them: top the plant to make more colas, then use LST to spread those colas into a flat, even canopy. That combination is what maximizes yield.
What is the best cannabis training method for beginners?
Low-stress training is the easiest technique to learn because it is nearly impossible to ruin - you are bending the plant, not cutting it, so there is no recovery risk. If you are nervous about cutting, start with the bend-first LST method in our LST guide and add a topping later. If you are ready to cut, run the topping-first routine above from the first grow. Both are valid, they are different methods, and both build the same flat canopy.
Can you train autoflowers?
Yes. We run the full routine on autoflowers, topping included, and it works well. The cut goes in the same place as a photoperiod, above the 5th node once the 6th appears - what changes is the margin for error, because an auto flips to flower on its own clock and cannot absorb a late setback. Autos get one topping rather than two, plus continuous LST, and that single cut should take very little plant material and go only into a visibly vigorous plant. If you are unsure of your auto's timing, run LST only - it carries no risk.
When should I start training my cannabis plant?
Start when the 6th node appears, roughly 3 to 5 weeks from germination - you top above the 5th node, so the 6th showing is the signal. By then the main stem is flexible enough to bend without snapping and the plant is established enough to absorb a topping. Do not train a seedling - weeks 0 to 2 are for root establishment. Starting here gives you the longest productive training window in veg.
When should I stop training?
Stop active training when the stretch ends, around day 21 of flower. By then the bud sites are set, so reshaping cannot add any and only risks the buds you have. Tucking under a trellis net is the exception and carries on through the stretch. LST clips are a veg tool and we do not recommend them in flower at all - from the flip onward it is wire ties and nets, holding weight rather than reshaping. All cutting methods like topping must be finished in veg, well before the flip.
Do I have to train my cannabis plant?
No, but an untrained plant grows like a Christmas tree: one dominant top cola and a skirt of small, shaded popcorn buds. Training is the single highest-leverage, lowest-cost thing you can do to improve a plant, because it only requires attention and a few cheap tools. Even basic LST on its own meaningfully improves how evenly your plant develops.
Can I combine training methods?
Yes, and you should. The methods are designed to layer. A high-yield grow combines topping (a high-stress method that multiplies colas) with continuous LST (a low-stress method that spreads them flat). You can add defoliation to keep the canopy open and a ScrOG net to lock it level. The only rule is to keep all cutting in veg and finish active training before the flip.
Is FIMing better than topping?
No. Topping makes a clean cut above a node and gives you two even, predictable colas, which is what a balanced structure or a mainline needs. FIMing removes about 75% of the tip and can produce three to five growth sites, but they come in uneven, which costs you the flat canopy. We do not recommend FIMing, and never on an autoflower.
Does training stress the plant or hurt yield?
Low-stress training does not wound the plant, so there is no real stress cost. High-stress methods like topping do set the plant back a few days while it heals, which is why you do them in veg where there is time. Done correctly, training increases the number of bud sites and improves light distribution. The mechanism is well established; the size of the benefit depends on your genetics and setup.
What tools do I need to train cannabis?
For LST you need soft ties - LST clips like the BudClips for upper branches and coated garden wire like the BudHuggers anchored to a fabric pot's grommets for lower ones. For topping and FIMing you need clean, sharp, thin-tipped scissors. Keep repair tape on hand for the occasional snapped branch. None of it is expensive, and the clips and wire are reusable indefinitely.
Is cannabis training different indoors versus outdoors?
The methods are identical; the scale and timeline differ. Outdoors you often have months of veg, so you can top three or four times and build very large plants. Indoors you are filling a fixed footprint under a fixed light, so ScrOG and a tighter canopy make more sense and you top fewer times. The timing rules - start when the 6th node appears, stop before the flip - are the same in both.
What is the difference between training and defoliation?
Training reshapes the plant's structure by bending or cutting branches to build an even canopy. Defoliation removes leaves to improve airflow and light penetration, but it does not change the branch structure. Defoliation is a support technique that makes training work better, not a training method itself. You defoliate lightly during Stage 2 and again after the stretch ends.
Get the free Training Cheat Sheet
When to make the first cut, how one stem becomes eight sites, and the clip-and-wire spread that flattens the canopy. One page for the routine, one for the schedule from node 5 to the flip. Printable, phone-friendly.
Get the Training Cheat SheetNext Steps in Your Grow
Training is the spine of the whole grow. A full grow runs: which seeds to buy for training → germination → planting → transplanting → training (you are here) → defoliating → harvesting → drying → curing.
If you are training your first plant, run the routine above exactly as written, and read the complete LST guide alongside it for the bending technique in more depth. To understand why an even canopy outperforms a tall one at the level of light physics, the why an even canopy beats raw wattage article is the deeper read.
The tools matter less than the technique, but the right tools make the technique faster. We built the BudClips for clean main-stem training and the BudHuggers for tie-downs to the pot. Train the plant well, and every stage after it gets easier. If you are still getting your bearings on where training falls, the week-by-week growth stages lay out the whole path from seed to harvest.
References
- Cline, M. G. (1997). Concepts and terminology of apical dominance. American Journal of Botany, 84(8), 1064-1069. https://bsapubs.onlinelibrary.wiley.com/doi/10.2307/2446149
- Roychoudhry, S., Del Bianco, M., Kieffer, M., & Kepinski, S. (2013). Auxin controls gravitropic setpoint angle in higher plant lateral branches. Current Biology, 23(15), 1497-1504. https://doi.org/10.1016/j.cub.2013.06.034
- Beveridge, C. A., Rameau, C., & Wijerathna-Yapa, A. (2023). Lessons from a century of apical dominance research. Journal of Experimental Botany, 74(14), 3903-3922. https://doi.org/10.1093/jxb/erad137
- Domagalska, M. A., & Leyser, O. (2011). Signal integration in the control of shoot branching. Nature Reviews Molecular Cell Biology, 12(4), 211-221. https://doi.org/10.1038/nrm3088
- Christie, J. M., & Murphy, A. S. (2013). Shoot phototropism in higher plants: New light through old concepts. American Journal of Botany, 100(1), 35-46. https://doi.org/10.3732/ajb.1200340
- Hawley, D., Graham, T., Stasiak, M., & Dixon, M. (2018). Improving cannabis bud quality and yield with subcanopy lighting. HortScience, 53(11), 1593-1599. https://doi.org/10.21273/HORTSCI13173-18
- Backer, R., Schwinghamer, T., Rosenbaum, P., et al. (2019). Closing the yield gap for cannabis: A meta-analysis of factors determining cannabis yield. Frontiers in Plant Science, 10, 495. https://doi.org/10.3389/fpls.2019.00495
- Crispim Massuela, D., Hartung, J., Munz, S., Erpenbach, F., & Graeff-Hönninger, S. (2022). Impact of harvest time and pruning technique on total CBD concentration and yield of medicinal cannabis. Plants, 11(1), 140. https://doi.org/10.3390/plants11010140

About the Author
Henrique Dias is the CEO and co-founder of BudTrainer. He is a mechanical engineer who also holds a graduate certificate in Commercial Cannabis Production from Niagara College in Ontario, Canada - the first college-level cannabis cultivation program in North America. Before founding BudTrainer, Henrique worked with Health Canada licensed cannabis producers, where he gained hands-on experience in cultivation, processing, and post-harvest management of cannabis at commercial scale. He started BudTrainer to bring that same level of craft to home growers through better-designed gardening tools and clear, science-backed education.
DISCLAIMER: Everything taught and sold by BudTrainer® is to be used strictly for legal purposes. We do not endorse the production of illegal substances and it is your duty to ensure that you are complying with the law. The words "hemp," "cannabis," "weed," and "marijuana" are used interchangeably to refer to the same plant (legal hemp with less than 0.3% THC) for the purposes of this lesson.